DEdit – Database Editor
![]()
![]() Documentation version 1.0 , 2003-11-15
Documentation version 1.0 , 2003-11-15
PickPocket-Item Tutorial
1: Step by Step a first simple database
Step 1: Open DEdit and set an RPS
|
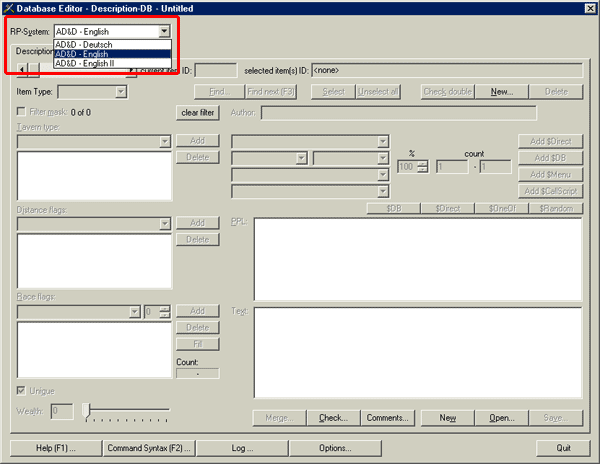
When you start DEdit, the first thing is, to select the roleplaying system (RPS) you want to write the descriptions for. In the top left corner of the screen is a drop-down list. Click on the small triangle and select AD&D – English. |
 |
|
The selected RPS defines
important parameters for the
database, e.g. saving folders, races, tavern types, language, etc. AD&D –
English is the standard RPS. We will use just this one in this tutorial. |
Step 2: Create a new database entry
|
First make sure you are working in the PPItems-panel. The main area of the editor is built by different panels, which can be brought to top by clicking on their name at the top of the panel. Click on the PPItems label to bring the PPItems-panel to the front. In the top-right corner of the panel there is a button labelled New.... Click on this button to add a new entry to the current database. A New PPitem window with two drop-down lists appears. Select travelitem as type and stuff as subtype. Then click okay. An empty PPItem-entry has been added to the database. |
 |
|
To not confuse the New.. button on top (which adds an
entry) with the New... button
at the bottom of the panel. The bottom one will create a new database
and not a new entry! However, if you accidentally hit the New... button at the bottom, a
pop-up window will warn you and ask you, if you really want to continue. Hit no to abort. |
Step 3: Write the descriptions
|
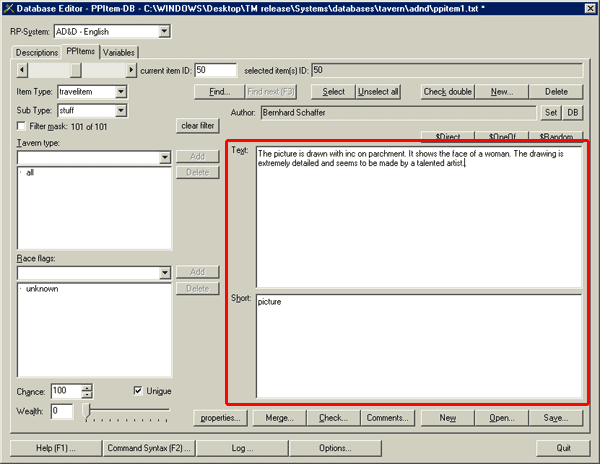
There are two text areas on the PPItem-panel. One is labelled Long and the other Short. Click into the Short area to get a blinking cursor in it. You can now write your description into that text field. The text you write here will be displayed as “short text” of the item. It should be of similar style and same grammatical syntax as the other descriptions of type “travelitem”! e.g. picture Now click into the Long area to get a blinking cursor in it. The text you write here will be displayed as “long text” of the item. It should be of similar style and same grammatical syntax as the other descriptions of type “travelitem”! e.g. The
picture is drawn with inc on parchment. It shows the face of a woman.
The drawing is extremely detailed and seems to be made by a talented
artist. Important: - You do not need to end a line with the enter-key. Long lines will be wrapped automatically. - You can not use any tabulators in the text - You must not use the following characters: § $ % < > { } |
 |
|
Keeping to the same
grammatical syntax of all items of same type is of major importance! Keep in mind, that other
will later use the $DB command to have the text inserted. As the algorithm
will randomly select one of the given type, the outcome will only be
syntactical correct, if all items are “similar”. If you therefore do
not know exactly, how the syntax of a certain item-type is, follow the
short tutorial on ‘How to find the proper
PPItem syntax’. If you are doing this tutorial for the first time,
forget about it and simply stick to the given examples. |
Step 4: Flags – wealth
|
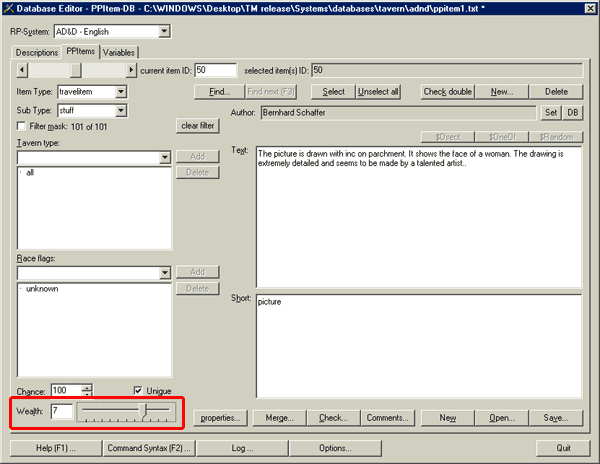
The slider in the bottom
left corner is labelled Wealth.
Here you set the wealth-level of your item. If you do not want to limit
your description you can leave the value at 0
= all wealth levels. For our entry here, we set the wealth level to 7, because we think that poor people will rarely carry a valuable inc drawing in their bags. According to the wealth-settings of the currently chosen RPS “AD&D” our dataset will only be used from within descriptions of wealth 4 or higher. |
 |
|
As with description flags, ppitem flags are used to limit
TavernMaker’s databases within the generation algorithm. Whenever the $DB
command selects from the ppitem-databases, it first filters them according to
those flags. Note, that the “wealth”-level which is now used to filter the
database is not the set pricing class of
the tavern, but the wealth level of
the description from which the $DB command is called! This means, that if the
user f.e. sets a pricing class of
cheap, the algorithm might choose
a description dataset of wealth 4 (because the allowed levels reach from 0 to
4) for a table, and that items called from within that dataset have a wealth
range from 2 to 7! So, in our example the picture might appear in a poor
tavern, but not for a poor table! |
Step 5: Flags – tavern type
|
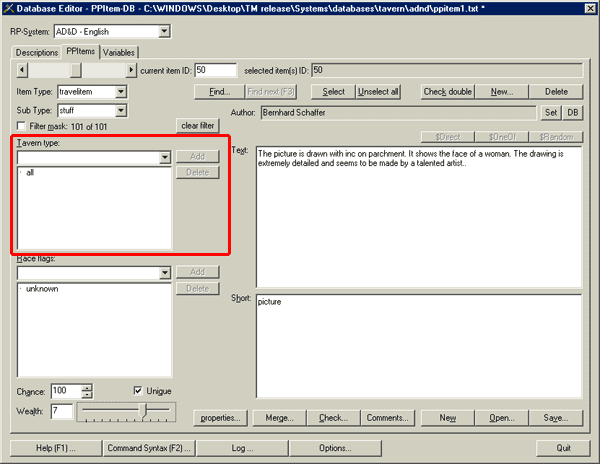
There are two combined drop-down list / listbox areas on the PPItem-panel. One of them is labelled Tavern type. Here you select in which taverns the description might be used. Select a type with the drop-down menu and hit the Add button next to it, to add that type to the listbox. To remove a type, click the line within the listbox and hit the Delete button. If you add the type all, the listbox will be cleared and just all will remain. As the name suggests, such a database entry can be used independently of the chosen tavern type. We think that there is no reason to limit the appearance of a picture in a customers bag and therefore leave the flag at all. |
 |
|
The tavern type flags of
an entry are directly connected to the tavern types which can be chosen in
TavernMaker. If e.g. a restaurant tavern
is generated, only entries which have either the all or the restaurant
flag can be chosen. |
Step 6: Flags – races
|
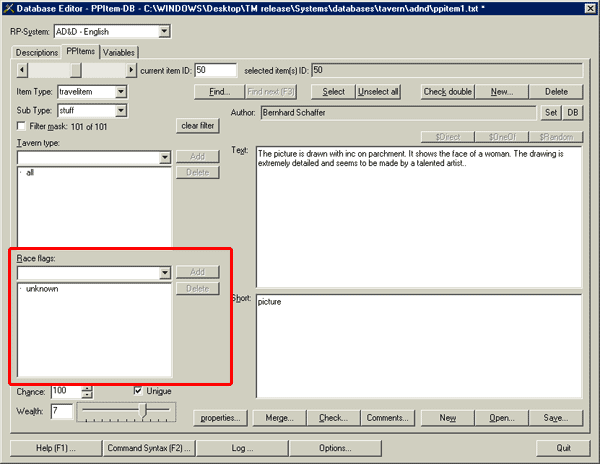
The second combined drop-down list / listbox is labelled Race flags. Here you can set for which races the current dataset is allowed. All races in the list get a logical OR combination. This means, that if you set f.e. gnomes and halflings, the current dataset might be used within descriptions which either have a gnome or a halfing (or both) flag setting. unknown race flags are allowed for all descriptions. There is no need to restrict our ‘picture’ dataset, so we leave the settings unknown. |
 |
|
Please note that the race flags work differently for description and ppitem datasets! While for descriptions they
count the races which are really present at a table, they limit the use of the items of a
pickpocket-database. In ppitem
database the race flags are used to exclude ‘race specific’ entries from
regions in which the race is not present. In other words: If the user creates
a ‘pure human’ tavern, with ‘pure human’ guests, he does not want them to carry
an elven sword! It is also very unusual that a dwarven warrior will carry an
elven longbow... |
Step 7: Flags – chance
|
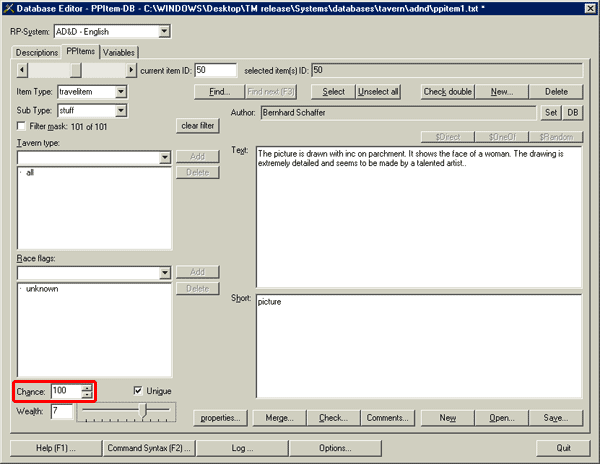
In the bottom left corner there is a number box called Chance. This is used to set the chance that this item is selected. Our item is in no way very special, so we do not want to reduce its chance of being selected and leave the value at 100%. |
 |
|
What is this “Chance” all
about? Whenever the $DB command selects an item, it first filters the
database and then selects one of them randomly. What would happen, if the
item-database would have 9 different datasets for commonly used swords and
one holy artefact sword of magical bonus +5 ? Out of statistics every 10th sword-wielder
in our tavern would own such a magical sword! That is definitely something we
do not want to happen! Therefore, we have the possibility to reduce the chance of the artefact sword to a
value of e.g. 1%. Now only in 1% of all cases the magical sword will be
included into the group from which the sword will be selected. This leads to
a total chance of 1:1000 that the sword appears! |
Step 8: Flags – unique
|
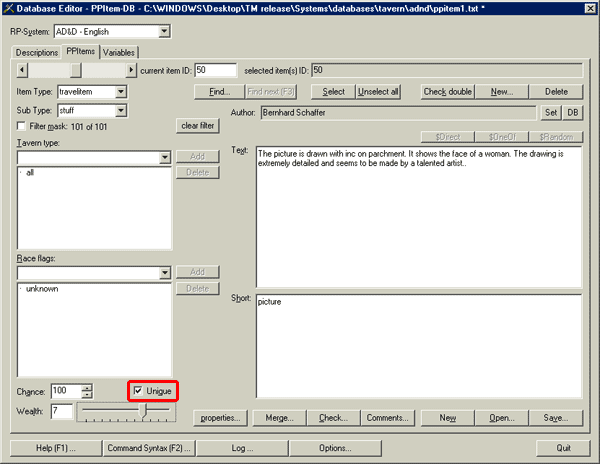
In the bottom left corner there is a checkbox labelled Unique. Here you can set whether or not that database item might appear more than once in a generated tavern. We do believe that it would be quite unlikely to have two people carrying a “valuable picture showing a woman’s face” in the same tavern, therefore we check the unique checkbox. |
 |
Step 9: saving the database
|
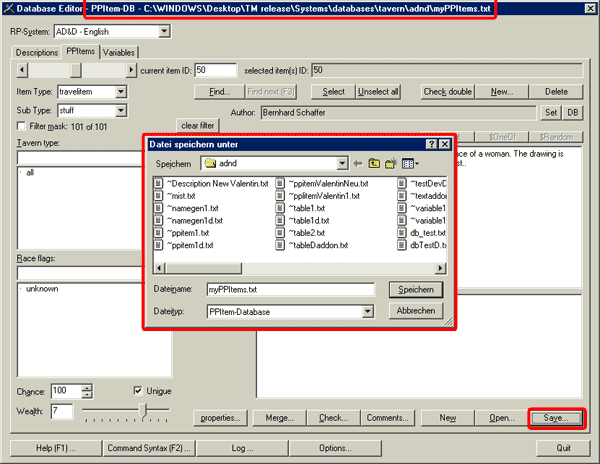
You have now written your first entry. It is time to save the database! In the bottom-right corner of the PPItem-panel you can find a Save... button. Click on it and you will be presented with a standard windows-saving window. The proper folder is automatically chosen as starting location of the explorer, so you do not need to change the saving folder. Just type a file-name and save. The file type will be PPItem-database and the file suffix *.txt. You can change neither of it. Once you have saved your database, its current position is displayed on top of the DEdit-interface next to the RPS-selection drop-down. (A star at the end of the name means that the current version is not saved.) |
 |
|
Sometimes (-not if you did
everything correctly in this tutorial-) you will be presented with a Check Results pop-up window at saving.
DEdit automatically checks that the database entries are syntactical correct.
If anything is amiss, the Check Results window
appears and tells you (in red) which entries are invalid. |
Step 10: adding flexibility
|
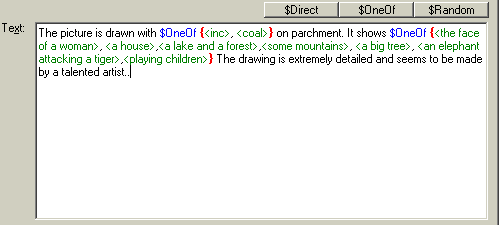
Now we have created a picture. Great. But it is always showing the same thing. We could now either add similar datasets with other motives, or – which is much easier to achieve – use TavernMaker’s capability of scripting commands. Most of the commands which are available for description datasets are also available for pickpocket item datasets. Especially the $OneOf , the $Direct and the $Random commands should be used regularly in PPitem datasets! Let us now update our picture dataset by adding some $OneOf commands as shown below... |
|
|
|
We can preview the outcome of our description by pressing (and keeping hold) the F4 key. Now we have created enough flexibility in the dataset, so that it can be used more than once in one tavern. Therefore we uncheck the unique checkbox! We now use the shortkey combination CRTL + S to quicksave our database. |
|
It is very important to
check that all possible
outcomes of the dataset fit to the given flags!
We therefore must not create combined datasets for very valuable
and very cheap items, because we would not be able to set a proper wealth flag. Here we have to create
two independent datasets, one with a high wealth flag
and one with a low wealth flag. The
same is true for the other flags as well... |
Step 11: More entries – some advice
|
You have now learnt how to write a valid entry. Repeat steps 2 to 8 to add more entries. Remember: Quality is important! Rather write few entries with a huge portion of creativity than a lot of entries which are more or less the same but just vary with small details. Use the scripting commands to add flexibility, but always check for compatibility with the flags. It is very important that the short text and the long text of the datasets fit together (in preview-mode: F4) f.e. if you at a $OneOf command to randomly get a ‘sharp’ or a ‘blunt’ edged sword, and you want to have this also in the short text it is not enough to add the same $OneOf command there! Because what can happen is, that the short text then reads ‘a blunt edged sword’ while the long text describes ‘a very sharp sword’ ! The only way to overcome this problem is by using variables, but that is described in more advanced tutorials. For simple databases simply keep to the rule that you check (by pressing the F4 button) that the output always fits together. In case of doubt, create a second dataset instead of using the $OneOf command. A third very important point is, that the grammatical syntax of the datasets fits to other datasets of same type. Learn more about it in the short tutorial on ‘How to find the proper PPItem syntax’. As a beginner, I would recommend that you just add new items to already existing types/subtypes following examples of already created datasets. Later, however, you will see the big advantage of different PPItem databases and will create new types/subtypes. In that case, however, make sure that you are not using types which are already defined! |
Step 13: database comments
|
Every database has a
small comment section,
in which its creation date, the creating author and some author’s comments
are saved. You can access the author comments with the Comments... button at the bottom. |
 |
Step 14: testing & verification
|
Once you have saved your database, it will be automatically used by TavernMaker, because TavernMaker uses all databases it finds at the proper location for generation. If you remove all databases except your own from the folder, TavernMaker will only user your own database, which can be a good method of testing big, genuine databases. However, testing PPItem databases is more easily achieved by following these steps: - Save your PPItem database (e.g. by pressing CRTL + S) - Switch to the Descriptions tab of DEdit - Add a new description (of any type) - Place the cursor in the PPL or the Description text-field -
Select the type/subtype of the item
you want to test in the “Add $DB” command listboxes - Write a typical sentence in which you want your items to appear and use bot hthe %s and the %l place holders in the $DB command. - Press F4 several times and check the results. Is everything as you expect it? Once you are satisfied with your work, you should send it to the project leader. This is a very important step, because it is the only way to distribute your files! The files, as they are created by DEdit, will work on your PC only, until they get a verification by one of the project leaders. Do not share your databases or put them online! The concept of TeamWare is, that all are building together and that there is a central part, where all work is combined into the product. This place is exclusively the homepage of the project. Please link to the page, but do not provide direct downloads, nor links directly on the files of the page. |